>
resources
>
Cancel Apple Music Subscription
How to Cancel Apple Music Subscription

LAST UPDATED: Mar. 02, 2017
Part 1. Cancel Apple Music on ComputerPart 2. Cancel Apple Music on iPhone, iPad or iPod TouchPart 3. What Happens to your Saved Songs after Canceling Subscription?Part 4. How Can I Keep Apple Music Songs Forever?
Have you subscribed the Apple Music streaming service? Do you like it? As Apple offers a free three-month trial to everyone, many of you would like to start the trial to listen to the latest music. At first, you will be attracted by its rich music collection and powerful features. But when you get tired of its service, you'll want to cancel the Apple Music subscription. Don't know where to cancel Apple Music subscription? Just follow the step-by-step guide below to cancel your Apple Music.
Part 1. Cancel Apple Music on Computer
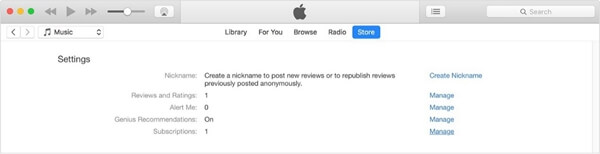
Step 1. Open iTunes on your Mac or Windows PC. Then sign in the account with Apple ID associated with your Apple Music subscription. In the drop-down menu, select "Account Info" and then enter the Apple ID password.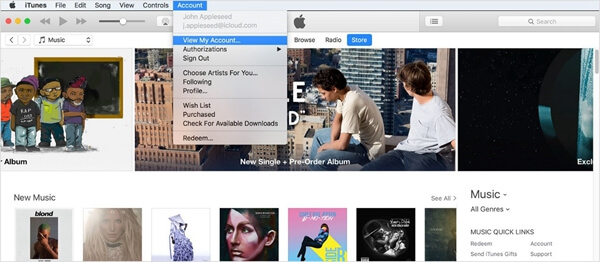 Step 2. Now you will see the Account information screen for your Apple ID. Here, scroll down to the "Settings" section and click "Manage" on the "Subscriptions" line.
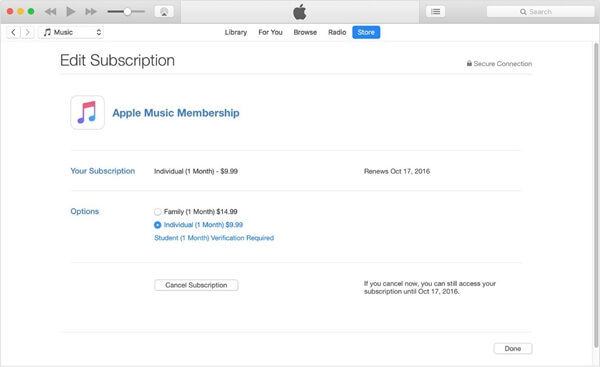
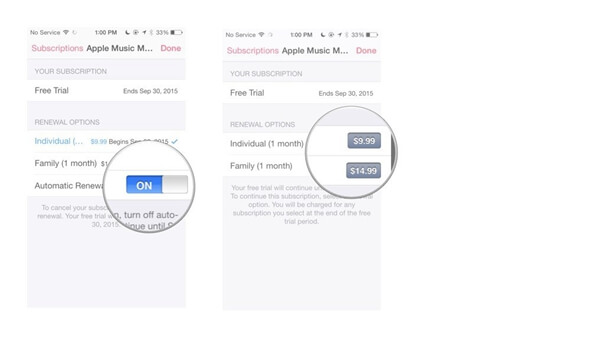
 Step 3. In the entry for Apple Music, click "Edit". Now find the "Automatic Renewal" section and click "Off" button. Finally, click "Done".
Part 2. Cancel Apple Music on iPhone, iPad or iPod Touch
Step 1. Go to "Settings" > "iTunes & App Store". Now tap on your Apple ID at the top of the screen. Please make sure this Apple ID is the one associated with your Apple Music subscription. Tap "View Apple ID" and you'll be asked to sign in with your Apple ID password.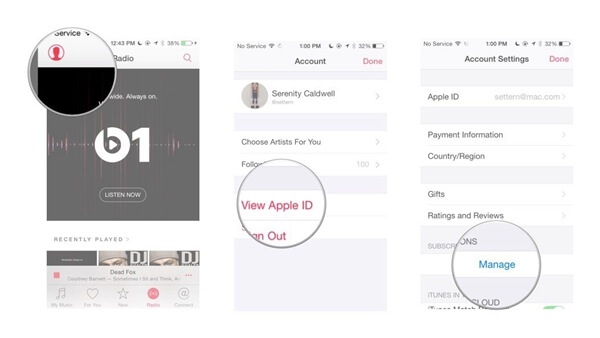 Step 2. On the "Account Settings" page, select "Manage" under the subscriptions section. Now tap on "Your Membership above Apple Music Member ship. Now turn the slider next to Automatic Renewal to Off.
Part 3. What Happens to your Saved Songs after Canceling Subscription?
You may have downloaded some Apple Music songs for listening offline while you were using Apple Music. But it doesn't mean you actually own the music even you have paid for the music service. The offline listening feature just allows you to enjoy the music when you have no internet connection. So, if you cancel Apple Music plan, you will no longer be able to listen to the saved songs.Part 4. How Can I Keep Apple Music Songs Forever?
As we all know, Apple Music tracks are encrypted with DRM copyright protection. To keep the Apple Music tracks after the subscription ends, you must convert the DRM-ed Apple Music to other usual audio formats for keeping forever. With Apple Music Converter, you can easily complete this process. Main Features of Apple Music Converter • Remove DRM from Apple Music, iTunes M4P files, Audible audiobooks. • Convert protected Apple Music, iTunes M4P and Audible AA/AAX to MP3, AC3, FLAC, etc. • Extract audio files from iTunes movies, TV shows, and Podcasts. • Keep ID3 tags for converted MP3 and M4A files. Step 1. Launch Apple Music Converter on the computer. The iTunes will be automatically opened. Step 2. From the "Playlist" section, choose the downloaded Apple Music songs. Step 3. Go to "Output Setting" section and choose an output format you like. Step 4. Now click on "Converter" button to start converting Apple Music.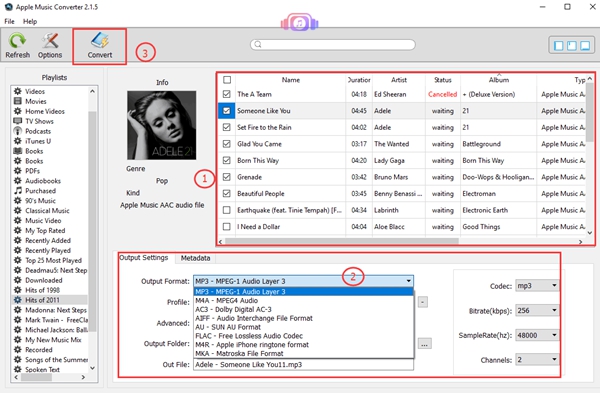 There you have it! Now you can get the copies of the DRM-free Apple Music songs so that you can save the Apple Music songs after the subscription ends. Now if you tried out Apple Music and decided that it's good for you, you can follow our instructions to cancel your Apple Music and keep the downloaded songs forever.
Popular Articles
- How to Cancel Apple Music Subscription
- What Bitrate Does Apple Music Stream At? 256kbps
- Apple Music Vs iTunes Match: The Difference and The Relationship
- Apple Music Device Limitation: Can I Play Apple Music on Multiple Devices
- Best 5 Free DRM Removal Software for Mac 2022
- Which is Better: Spotify or Apple Music?