Although the online music streaming becomes more convenient for people to enjoy the songs, it still has the time when you want to burn the songs to CD for saving to play with better media devices such as a computer, CD player, and so on.
However, we also know that Apple Music songs are all saved in DRM-protected AAC or M4P format, so Apple won’t let us to copy them for burning to CD disks. So, is it possible for use to burn Apple Music songs to CD for keeping? Honestly, this is not a difficult thing when you get the right tool to help. In this article, there will be some methods provided to help you burn protected Apple Music to CD easily. If you also need, continue to have a look.
People Also Read:
• How to Burn M4P to CD• How to Remove DRM from Apple Music [4 Best Solutions]
Part 1. Tools to Prepare for Burning Apple Music to CD
We know that Apple Music doesn’t provide the direct option for us to burn the songs to CD, so we must receive help from some tools. Here are some things you need to prepare before starting to burn Apple Music to CD:
• Apple Music Converter (the tool used to remove DRM protection from the protected Apple Music songs)
• Windows or Mac computer with internal or external CD drive (to insert the CD disk for burning Apple Music songs to)
• A blank CD (used to save the converted Apple Music songs)
• iTunes (on Windows) or Apple Music (on Mac) with the songs saved in the Library
• A CD burning software (such as iTunes or other third-part software)
When the tools are all prepared, you can begin the process to burn Apple Music to CD. At first, let’s start with the first step – convert the protected Apple Music songs to DRM-free MP3 files.
Part 2. First Step: Convert Protected Apple Music to MP3
As introduced above, Apple Music songs can’t be directly burned to CD because of the DRM protection, so let’s firstly remove the DRM from them and get the DRM-free audio files. Here we need to use Apple Music Converter.
Apple Music Converter provides powerful and reliable function to help people to remove DRM from Apple Music, iTunes Music, and also Audible books within easy steps. Then by converting the songs to common formats such as MP3, M4A, AAC, and so on, people can save the songs to any devices or play them with any players. When in the DRM-free condition, people can also directly burn them to CD without limitations anymore.
Key Features:
• Support common audio formats such as MP3, M4A, AAC, AC3, AIFF, and AU
• Keeps the original quality and ID3 information to convert Apple Music, iTunes Music, and Audible books
• Supports the fastest 10X speed to convert songs in batch
• Runs fluently on both Windows and Mac computers
• Connects to iTunes for uploading the songs saved in iTunes Library automatically
How to Convert Apple Music to MP3
Step 1. Connect Apple Music Converter with iTunes
When you have installed Apple Music Converter and iTunes, open the converter and it will automatically connect to iTunes. Then you will find that the iTunes Library will automatically import to Apple Music Converter.
Step 2. Select Apple Music Songs to Convert
From the “Library” in Apple Music Converter, people can choose the songs you want to convert to MP3 and burn to CD now. Directly select the songs after finding the playlist in Apple Music Converter.
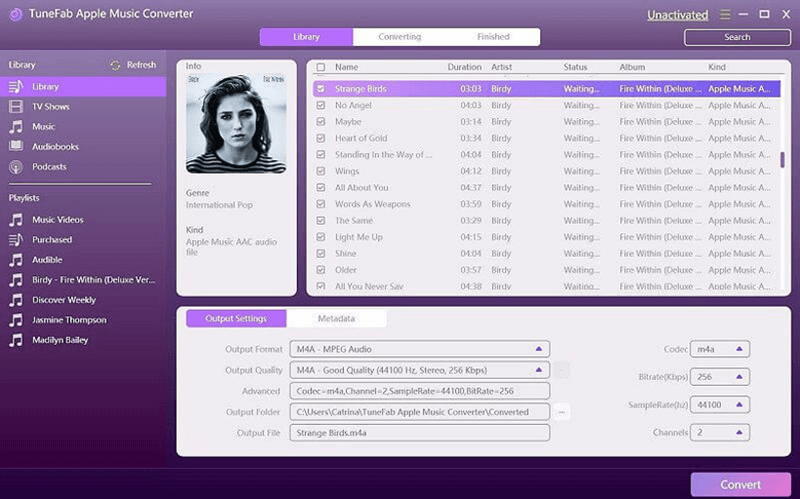
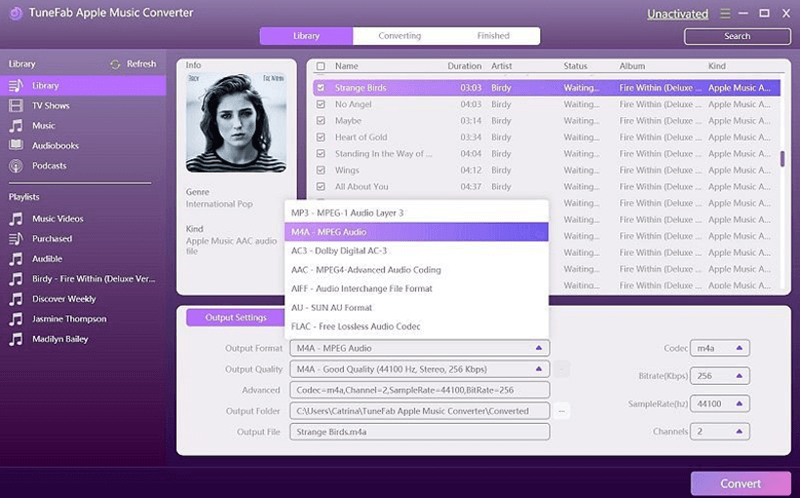
Step 3. Choose MP3 to be the Output Format
When you go to “Output Settings” now, you need to choose MP3 as the output format. Apple Music Converter also allows people to adjust the parameters here, so you can change the “Codec”, “SampleRate”, “Bitrate”, and “Channels” for converting the songs.
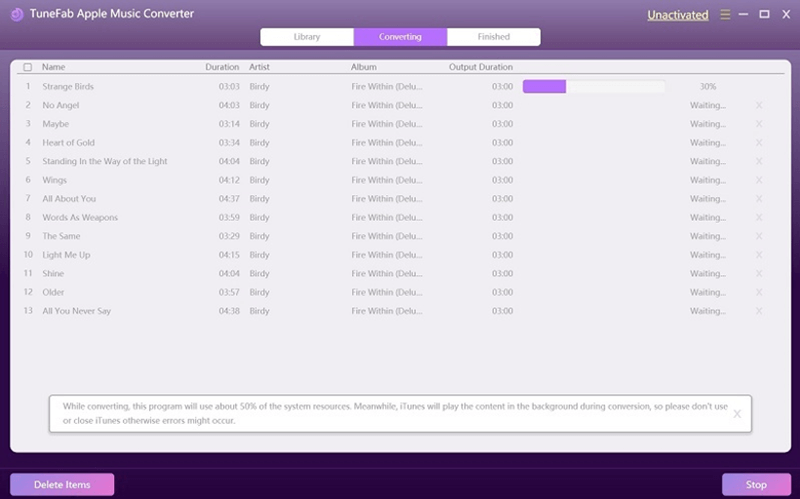
Step 4. Convert Apple Music Songs to MP3
Finally, directly press the “Convert” button to convert the selected Apple Music songs to MP3. The 5X faster speed will let Apple Music Converter to finish the conversion quickly. Then you can get the DRM-free Apple Music songs for getting ready to burn them to CD.
Part 3. Burn the Converted Apple Music Songs to CD with iTunes
When you have converted the protected Apple Music songs to MP3 audio files, you can get them and use iTunes to burn the songs to CD now. You only need to follow the steps below to get the converted Apple Music songs burned to CD easily.
Step 1. Open iTunes on your computer, then you need to add the converted Apple Music songs to iTunes Library by going to “File” and select the “Add File to Library…” option.
Step 2. Now, you need to create a new playlist and drag all the converted Apple Music songs for saving to this playlist after adding them to iTunes Library.
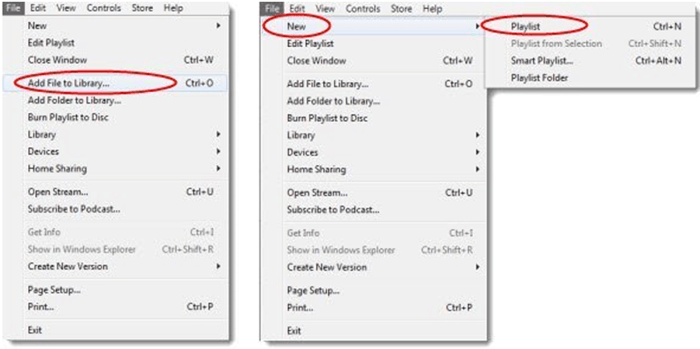
Step 3. Then you need to insert a blank CD to your computer. When the CD disk can be detected by the iTunes, you should right-click the newly-created playlist and select to “Burn Playlist to Disc”.
Step 4. Select the speed and disk format for CD burning when a new window shows up.
Step 5. Finally, press the “Burn” button and the converted Apple Music songs saved in this new playlist will be burned to the CD disk immediately.

Part 4. Other Ways to Burn Apple Music Tracks to CD on Windows/Mac
Except for the method provide above to burn converted Apple Music songs to CD with iTunes, here are also other two ways for Windows and Mac users to do the burning process without using iTunes. Let’s see how.
On Windows – Use Windows Media Player
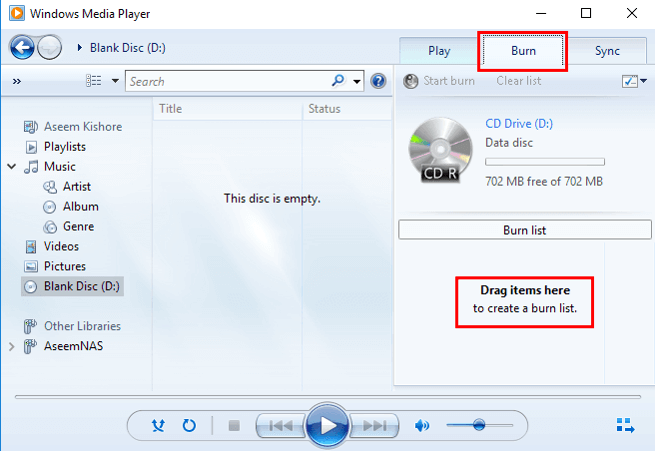
Step 1. Firstly, you need to open Windows Media Player and go to “Playlist” for creating a new playlist and import the converted Apple Music songs to the program.
Step 2. Then insert the blank CD and click the “Burn” button in the top-right corner of the Windows Media Player for adding the newly created playlist to the “Burn List”.
Step 3. Finally, select the “Audio CD” option and directly press the “Start Burn” button to begin the process of burning the Apple Music songs to the blank CD.
On Mac – Use Music App
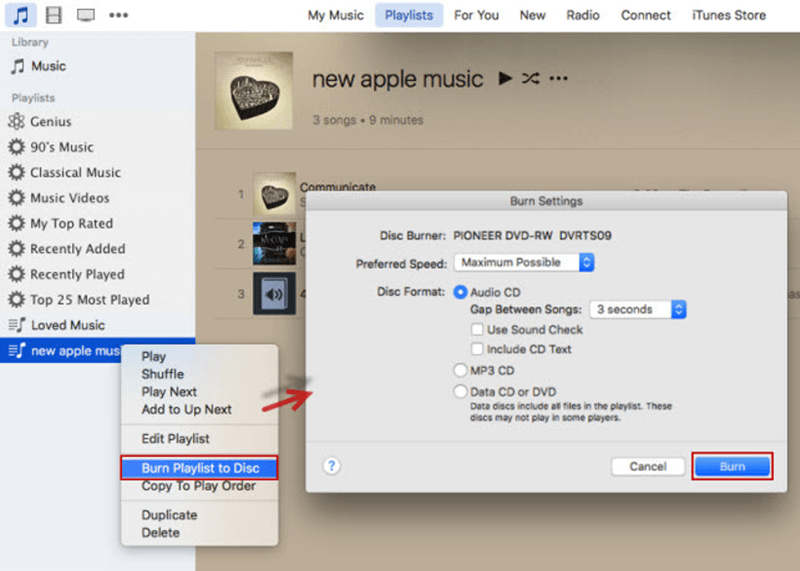
Step 1. On your Mac, open the Music app and the create a playlist to save the Apple Music songs you want to burn to the CD to the list.
Step 2. Now you should select the playlist and then choose “File” for selecting “Burn Playlist to Disc”.
Step 3. Make some settings such as selecting a disc format and set the recording speed or volume.
Step 4. Finally, start burning the Apple Music songs to CD by pressing the “Burn” button.
Part 5. How to Burn Purchased Apple Music Songs onto a CD
For the purchased Apple Music songs, you can directly pay for them in the platform and directly burn to CD (using Music app or iTunes). When you find the song you like in iTunes Store, by clicking the “…” button, and the “Buy” option will be provided. Click it and pay for the song buying fee. After getting the purchased Apple Music song now, directly follow the tutorial in the former parts to try burning the purchased Apple Music songs to a CD using iTunes (on Windows) or Music (on Mac).
In Conclusion
There are different ways we can use to burn Apple Music songs to CD when we need to collect them in a disk. Among the options above, I prefer to use Apple Music Converter because it can help burn not only Apple Music songs but also iTunes Music and Audible books as well. What about you?