Your No-Nonsense Guide to Copy iTunes Playlist to USB
When we enjoy Apple Music service, we are clear of iTunes playlist (including the old iTunes playlists and Apple Music playlist) only can be accessed with Apple account. Moreover, Apple Music service limits music playback after the end of subscription, thus people cannot keep them as a local file. Although you can download music tracks from iTunes and Apple Music, they are under DRM protection. Therefore, even we transfer iTunes Playlist to the memory stick, it cannot be recognized.
Considering people have difficulties in copying Apple Music songs to other devices, this article will guide you easily to convert iTunes playlist to USB.
People Also Read:
• 7 Ways to Transfer iTunes Playlist to Spotify Easily• Is It Possible to Play Apple Music Songs on Android Tablets
How to Copy iTunes Playlists to USB
First, you need a good tool to remove DRM from iTunes Playlist. Apple Music Converter can remove DRM from M4A, M4B, M4P, M4R files and convert them to MP3, AC3, FLAC, AIFF, etc. It's designed to unlock DRM protection so that you are able to copy those iTunes playlists to USB.Step 1. Launch Apple Music Converter
You need to install the program on your computer first. Then Launch it and iTunes will be launched automatically. The iTunes Library will be sync to program completely, so you don't need to add iTunes playlists manually.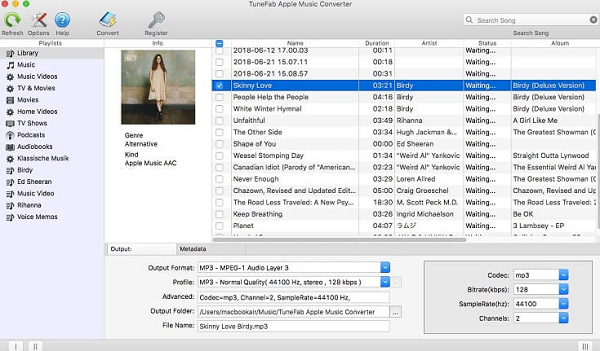
Step 2. Select iTunes Playlist to Convert
Choose your favorite playlist to convert, you can search songs you desired at the top searching box.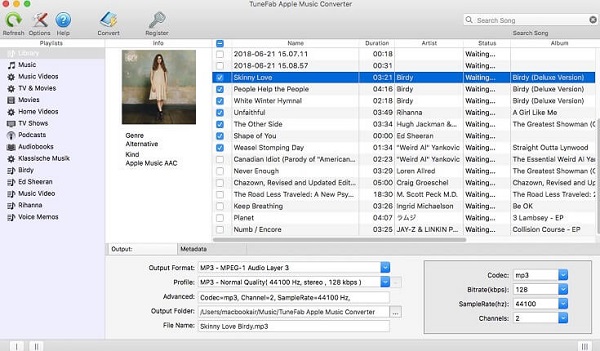
Step 3. Choose MP3 as Output Format
MP3 is a popular file format that can be saved as a media file and transferred to USB. So you can convert iTunes playlists to common MP3 files. Click "Output Setting" > "Output Format" > select "MP3" as output format.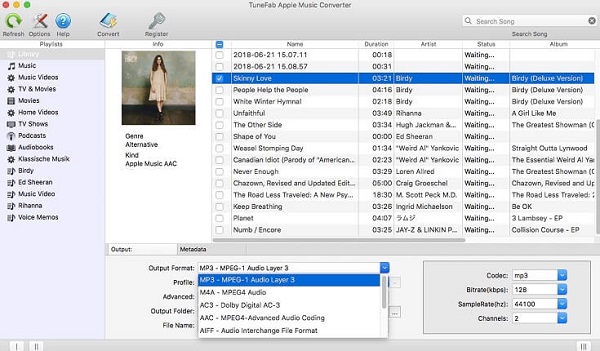
Step 4. Convert and Copy iTunes Playlist to USB
After music files are in full preparation, you can click on "Convert" button to start converting. The whole process will be finished in a short time. Then insert a flash drive to your PC, go to the output folder, copy converted iTunes playlist and paste to the USB drive.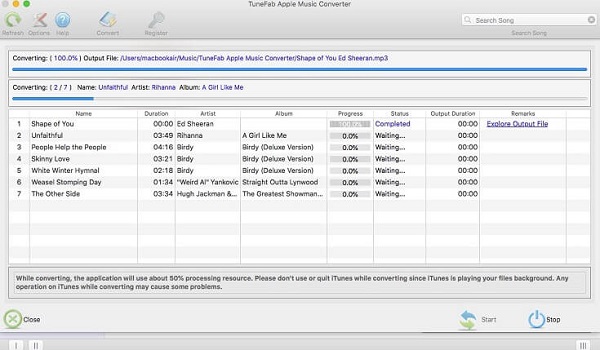 Follow the guide step by step you can copy and transfer iTunes Playlist, and also the Apple Music playlist to USB. With the help of Apple Music Converter, you can enjoy whatever music you like in car from now on.
- 5 Ways to Convert Apple Music to MP3 [Latest Update]
- How to Remove DRM from Apple Music [4 Best Solutions]
- How to Convert Audible AA Files to MP3 [Simple Ways]
- M4P to MP3 – How to Batch Convert M4P to MP3
- Ultimate Ways to Convert AAX to MP3 [Fast and Safe]
- Convert M4P to M4A Tutorial [Top 4 Methods]

